December 30, 2009

New Year's Champagne Count Down.

Hosting a New Year's Soiree? Here's a simple idea for party favors and fun. All you need are a few things from your party store and to make a trip to the grocery to create a little baggy of fun.


What we have above is tissue paper, favor bags, noise makers and your favorite snacks. I went with a sweet and salty combo. All you do is fold up the tissue paper, put in your snacks and roll up the top with the noise makers. Simple and quick. I did one for each couple.


Add some silly 2010 glasses, snack plates and of course champange and you're ready to go!


Happy New Year everyone! I'm looking forward to 2010!

December 24, 2009

Jingle All The Way.

Love these jingle bells from Old Time Pottery to add a little cheer and glitz to a special gift under the tree.

December 23, 2009

Make It Something Special.


We've all done it. We peel the sticky stuff off the back and slap it on a present at the last minute. Guilty. Before you get completely complacent with that option, consider another.

Transform that plain ole bow into something more special. Here's a step-by-step:


  1. Take your regular gift bow and get ready to snip snip!
  2. Start by taking your scissors and cutting out all the loops. I suggest that you cut just inside of the curve of the loop so it keeps is shape and curls inward.
  3. Make sure to cut all of the loops and push all of the curls out of the way.
  4. Once you have all of the loops cut, do the same to your second bow.
  5. Place your second bow inside the fist and fluff!
This is great way to use up those gift bows and make them a little more special. You can even take 4 or more to make a large pom to go on a larger gift to make it stand out from the others.

MERRY CHRISTMAS!

Photo from MarthStewart.com

December 18, 2009

Making Last Minute Gifts Look Not So Last Minute.

Photo: MarthaStewart.com


We've all be there. The last of the gifts have been bought but you still need to wrap them! (They usually end up in a gift bag with bright red and green tissue paper stuffed on top.) It's not hard to make your gifts look like you spent a lot of time on them - inside and out. And who better to show us all the possibilities for any occasion than Martha Stewart her self. Here's a little photo montage for inspiration.

I truly like this the image above - doilies are so inexpensive but look at the whimsy it brings to this package. And you don't even have to tie a bow! Pretty much anything you grab to put on a package as a bow or garnish to make a gift look that much more special. Yarn, pipe cleaners, left over ribbon, fabric from the $1 bin. I am a big believer in real ribbon for gifts. I looks much more personal. And if that is all you add to your wrapping, then it's a big step!

With a little planning and some creativity, we can all wrap like Martha. Enjoy your last minute shopping!

December 16, 2009

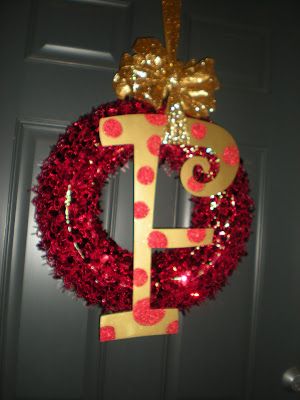
Q. & A. ::: Are Wreaths Year-Round Decor?


Q: Got a decor question for you. Are wreaths year round?? I would love to make a wreath like you did with the "F" on it, but I have blown my Christmas decor budget and need to wait until after Christmas to make one. But, I don't if they are year round and what colors to use?! Help please.


A: Yes, I think so. I keep my red one up until Valentine's Day. Then switch to yellow for Spring and Summer, (briefly taking it down so the finches don't make a nest in it), orange for fall and back to red for the holiday's. I would suggest a grapevine wreath - very inexpensive and lasts forever + goes with every season. Each season, you can repaint your C and add picks of berries or flowers to go with the season. That way, you have one wreath to buy with many options! Michael's has a lot of Christmas stuff 60% off right now and often sends out a 40% off coupon. Go through your Christmas decorations that you aren't using or pull some stuff off of your tree and wallah! I got my "F", which is metal, from Kathy's of McMinnville at Christmas Village and painted it myself.

December 10, 2009

Mantel Mount Up.

Good-bye traditional mantel....Heeeeello Christmas!

Green trees: TJMaxx
Wreath: Pier 1
Stocking Hangers: Wal-Mart
Green Ornaments: My tree
Red and Gold sprays: Old Time Pottery
Stockings: hand designed and made
Gold Candle Sticks: Old Time Pottery

December 7, 2009

Recycle Your Fall Wreath for the Holiday's.

Remember this fall wreath from last month?

Well, it's not the same any more! I updated it for Christmas and here's the final product:


I used the same spray paint from the top hat Christmas tree topper - gold metallic then glitter gold. Then I painted the dots a metallic green. And that didn't work! Not enough contrast between the gold and green. So, I decided to sprinkle red glitter on the still-wet green paint and wallah!


I really think it adds so much more personality to the wreath!

The rest of the decor goes like this:
Wreath: Old Time Pottery
Large Ornaments: Old Time Pottery
Pre-Lit Garland: Wal-Mart
Gold Ribbon: TJMaxx
Light timmer: Wal-Mart

December 4, 2009

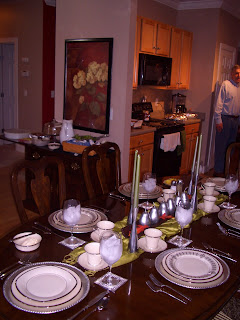
Holiday Entertaining. Table Design Tips.


Your dining room table is a great place to get glammed up for the holiday's. It's probably the largest place you can take advantage of for any seasonal decor. And if you don't have a mantel, then this is the place to set your focal point. A few basic tips:

1. Chose a theme. This one is simple. It's silver.
2. Chose a centerpiece. Usually the tallest piece of the collection.
3. Place items of varying height around it for balance.
4. Use odd numbers in your groupings but...
5. Symmetry is always your friend.


(Notice in #4, although I used even numbers of everything, there are 5 groups of items.)

Take your time looking in magazines or online to find what you feel fits your style personality.

This table isn't fully set for a dinner party, but it you need entertaining guidelines, Emily Post (heart her!) has a range of table setting guides from casual to formal here.

Tall Centerpiece: Vase: Old Time Pottery, Silver Branches: Old Time Pottery, Silver Spray: Old Time Pottery
Mirrors: Old Time pottery
Candle Sticks and Candles: Old Time Pottery
Silver pillar candles: Michael's
Square and Cylinder Vases: Target
White Vase Filler: Wal-Mart (a bargain!)
Silver Christmas Trees: Target
Silver mozaic candle holders: Old Time Pottery
Silver chargers: Hobby Lobby
Christmas China: Lenox
Silver balls: TJMaxx

December 2, 2009

Topping Off Your Christmas Tree. 2.

A top hat for your tree. How fun!


Here's how it was made! On a trip to Party City, I walked past this little gem. A Top Hat Ice Bucket. $10.And I thought - what a cute way to top off your tree!

After a trip to Michael's Crafts, conveniently down the street, I came home with a plan and lots of spray paint.

1. Fusion for Plastic
2. 18kt. Gold
3. Glitter in gold

For a base layer, I used a spray paint specifically for plastic. No sanding, no priming, quick drying, chip resistant. Then I used a metallic gold to act as the background color for the 3rd layer of gold glitter spray paint to glam it up some.


With a little green glittery ribbon and a few glittery feathers to top it off (no pun intended), I was extremely happy with the way it turned out!

November 30, 2009

The Tree is Offically Up.


A confession ::: most of the tree actually went up the night before Thanksgiving. I just. Could not. Wait. Any longer. We've added a lot of new stuff to the living room in terms of storage, so there was a lot of thought put in to where the (rather large for such a small house) tree would be placed. It ended up in the same spot as last year: in the hall, where our informal cafe table normally sits.

So, up went the pre-lit tree. Up went the big fat ribbon garland. Up went the ornaments. And then, as I stepped back to admire, it seemed bare. It needed more. So, I put mom in the car and off to Old Time Pottery we went! More ornaments, more sprays and a few more extra large adornments for the tree.

Additions:
gold leafy sprays $1.29 each
red grape clusters $2.29 each
extra large ornaments $3.99 each
peace & joy ornaments $2.29 each

I *heart* OTP!

November 27, 2009

Topping Off Your Christmas Tree.


During my childhood, the most exciting part of decorating for Christmas came when it was time to top off the tree. My brother and I switched off each year. We had a delicate & beautiful hand-crafted angel from Robert Moore & Co. Our tree was very traditional. White lights and ornaments ranging from the ones my brother and I made in kindergarten class to gifts and heirlooms. We loved pulling out all the favorites each year and carefully choosing a place for it to spend the next few weeks on our real tree. An angel topper was the most fitting for our tree's personality.

Each Christmas tree has a theme - a theme that reflects your family's personality. And the topper reflects that theme. What is your theme?. I have a different theme this year and will be working on it over the next few days. Stay tuned to see this unique idea for your tree this year!

November 26, 2009

Christmas Tree Oh! Christmas Tree.

Need a little inspiration this weekend while putting up your tree? Many of us get our decorations out with excitement and then realize that we need more ornaments or things aren't as pretty as they seemed last year. For those of us who will be doing adding a few touches or those completely starting over, here are a few tips for your trees.


1. Pick a theme. It's easy to go with a color theme - red, bright green and gold is mine. Everything from the ornaments, to wrapping paper and bows are all in that color scheme. You can also go for shabby chic, traditional, country, or even a candy colored theme that doesn't even use traditional Christmas colors.

2. Once you have the tree up, fluffed and the lights on, start with your base layer or decoration. If you are adding ribbon some sort of garland, this is the time to do it. Start at the top and work your way around, making sure to keep an even distance as you swirl around your tree. Don't have too much wine, or you'll get dizzy!


3. Make things odd. Groups of 3, 5 or 7 work best when placing things on your tree. Find balance in the colors and the groupings and the size of your ornaments. Get all of your ornaments out where you can see them at once. If you have a lot of the same ornament style, pick up 3 or 5 at a time and place them around the tree - starting at the top, then down a section on opposite of the first one, making a zig zag all the way around. Repeat with all of your decorations, making sure to take a step back every once in a while to see what you've missed or what needs to be moved to create balance.


4. Now is the time to add any type of spray or sticks or whatever to your tree. Place beautiful glittered poinsettia's around the tree using the same technique as above. Or use glittered sprays, branches or even feathers! You can place them around the tree or gather them at the top like a burst of glitteriness at the top.

5. No tree is complete without tons of gifts underneath! Find wrapping paper to go with your theme and wrap everything to coordinate. Use the same garland or ribbon you used on your tree or find the same colors. The possibilities are endless here.

In my opinion, a tree can never be too overly decorated. Seems to be the trend over the past few years to take the theme over board. It's always a work in progress. Enjoy your decorating.

November 25, 2009

StyleScope from HomeGoods.

Loving this. My love for HomeGoods is proved again... they have put together a style horoscope for their buyers.


The Results.


Although I didn't think the title matched my style personality, the description seemed spot on. Comfort. Warmth. Bold color. Balanced neutrals.


I love organizing, yet it is also a challenge in such a small home with little time. My bed is my happy place. We love entertaining, and it has become easy now that our pantry keeps things that are easy to whip up at the last minute.


Don't be afraid of bold color in small spaces! I have a dark chocolate bathroom, a huge red wall in the main living space and a bright green bedroom and it looks great - but somehow all cohesive. Think things through and take a look through different magazines for inspiration. A few of my favs... Pottery Barn, West Elm, Ikea, Crate & Barrel. Take the quiz here!

November 23, 2009

Fall Tablescape.


Love setting the table by the season.

Placemats: Pier 1 clearance table
Michael's: candles, berry ring, vase sand filler
Old Time Pottery: ceramic pumpkins, tall vase, vase rocks filler
Hobby Lobby: yellow spray (50% coupon)
Publix's: mini white pumpkins

November 20, 2009

Corporate Place Cards


Leadership Brentwood
held their Business & Economic Development Day last week. They had multiple panel speakers and needed professional and readable-from-a-distance place cards.

November 18, 2009

Spice Up That Fall Wreath.


This cute wreath is from Joann's (it was buy one get one free!) I decided to spice it up a little. Christmas Village this past weekend gave me a great idea - using a monogram. So, with a trip to craft store for spray paint and ribbon...this is how it started.


And this is how it turned out.


For those who are intimidated by making your own bows - here's a little How To. It is VERY simple.


1. Start by making a figure 8 with your ribbon.
2. Continue to stack the ribbon on top of itself, making multiple figure 8's. (On the last one, leave a tail.
3. Pitch it in the middle
4. Secure with a bread tie.
5. Wrap a piece around the center to cover up your tie (and make your second tail).
6. Cut the ends to have a clean finish.

Stay tuned...I'll show you how it will transform again at Christmas.

November 16, 2009

Thanksgiving Tablescapes.


Setting your table for Thanksgiving can set the mood and make your day feel special. Keep it simple - without a lot of clutter. Add a little something special with a favorite serving piece or dine by candle light.

November 14, 2009

Sink Organization.


Love this organizer from Oxo - it cleaned up and organized my sink area and gives the sponges time to dry out in between uses.

November 10, 2009

China Cabinet Redesign.

Last year, my china cabinet looked like this.


Just like my grandmother and mother's china cabinets were organized. I inherited 12 place settings of china from my Nana, and it is one of my most sentimental possessions. Wanting to display as much as I could, and using a more modern layout, I stacked all the plates and lined up the stemware so most of it could be on display. This also freed up a lot of space below in the drawers and shelves for linens, candles, etc. and brings more balance and depth to the overall look.

This is the after...


November 5, 2009

What I Want For Christmas.


The key to a small house (with an owner who loves to collect kitchen gadgets) is organization. I love these magnetic strips and containers for spices from Ikea. They are really a great buy and are so much less expensive than any others I've found. Hopefully, Santa will fill my stocking with them this year!

November 2, 2009

Current Obsession: Feathers.


A few years ago, I remember that feathers were going to be all the rave in bridal fashion. (It usually takes a little while for it to trickle down to the South... and it is finally here!) Ostrich feathers are a popular choice, but I love peacock feathers for fall weddings...definitely goes with all the popular jewel tones this season. For your Spring 2010 brides...peony's and ostrich feathers...like above are stunning.

Feathers are elegant...used in many a Victorian affair. I tell many brides when they are planning their wedding, a theme can help. Feathers can be incorporated into many places...bouquets...hair pieces...place settings...your dress...even your invitations. Now you don't have to go all Carrie Bradshaw on us...feathers can be a great detail for the fashionista in all of us.

October 30, 2009

Bridal Shows...Yay or Nay?

Came across an article this morning regarding Bridal Shows.

Bridal shows can be great to compare vendors if you use them correctly.

1. Start early in your wedding planning. I think attending bridal shows soon after you are engaged is key. It is a great way to find vendors.

2. Sign up for freebies! Who knows...you could win a free honeymoon trip. BUT, make sure they are giving it way during the show...it could be a scam to get your contact info and make you insane by emailing you 3 times a week, even after you are married.

3. Check our your vendor choices after the show. After finding your vendors, check for references and the Better Business Bureau. They might have a great booth and show a few of their best pieces of work, but that may not be the whole truth and nothing but the truth.

4. Get ideas. Bridal shows are a great place to get ideas to incorporate in your own wedding. Not all of us can afford to pay someone to make table arrangements for each table at your reception, but with a little inspiration, you can make it your own and put in a little DIY elbow grease.

October 28, 2009

Thoughts Reception Venues for the Do It Yourselfer's.

A HUGE factor in wedding planning with a budget is your guest list. The more people, the bigger space, the more food, the more beverages, the more etc. So, think about how many people you are inviting. Things you need to think about when looking at reception venues:

- To save money, have your ceremony and reception in the same location.
- Hold your ceremony/reception on an off day such as a weekday, Friday or Sunday.
- Ask your venue to make an itemized list of everything that you get when you book a reception there.
- Can you bring in your own food and beverages and are you required to use a licensed caterer?
- What are the kitchen facilities like?
- Do they have tables and chairs included in the price? Are there enough for your guests? (and what do they look like?)
- Do they have table linens, plates or flatware included in the price?
- Overall, how much work does it need to make it what you want? And are you willing to put in the elbow grease and ask for help?
- Do you have a group of local friends and family to help you pull it off?
- Do they have adequate coat check and bathroom facilities?
- What's the cancellation policy?
- Will they allow you to bring your own liquor? This is a HUGE plus!
- Is there room in the wedding venue for a band and/or dancing?
- Does the wedding venue already own a sound system with adequate speakers or will that need to be rented?
- Is there a space for the bride and groom to change and/or relax?
- Where can your guests park? Are there extra fees for parking? Do they have valet parking?
- Are candles or other open flames allowed?
- If its an outdoor location, do they have any backup plans for rain or other inclement weather? If not, is there a place that you can put up a tent?

October 26, 2009

Brinkley-Kinslow Reception.


Danielle and Kris know how to throw a party! I tip my hat to the wonderful Laurie of Nashville Event Space who planned this shindig. The couple and bridal party were introduced and the partying began. I love the gobo...an easy way to punch up your space with little effort and incorporate a theme.

Picking a great space for your reception can save you a ton of money and effort. The Avenue made a great backdrop to add beautiful linens, lighting and centerpieces for a great atmosphere.

At the end of the evening, the couple ran out and hopped in a trolley to make their get away. When my husband and I were taking their goodies back to their house (remember they are our best couple friends!)...look who showed up...so we snapped a picture of these two making their first trip through the front door as a married couple.

October 23, 2009

Brinkley-Kinslow Wedding Day.


This morning started early! With trips to the reception venue (more on that wonderfulness later!), church, delivering lunch (and champagne!) to the salon and running errands before the grand event. The bride was so relaxed and ready for her big day! I loved her Tennessee Titans garters and her shoes were so cute. Check out her flowers...beautiful fall wedding colors.


Danielle's dress is from David's bridal. She wasn't even shopping for gowns yet, saw it in the store and never tried another one on! Maids wore chocolate brown, also from David's Bridal.

October 21, 2009

Brinkley-Kinslow Rehearsal.


Danielle and Kris were married this past Saturday at First Baptist Church in downtown Nashville. The rehearsal went so smoothly...after everyone showed up a little tardy due to Nashville Predators game traffic! Some pictures above are of the bridal party. I especially love the one on the bottom right with Danielle's stunning daughter.


Next, we were off to the Rehearsal Dinner at Sunset Grill. The food, staff and venue were wonderful - I would recommend this place to all brides for their rehearsal dinners. They have a fabulous private room for events such as this. Cocktails were served as guests arrived with a slide show of the couple's favorite memories on the back wall. Notice the menus and place cards? They added a special and personable detail to the space. The bridesmaids presented the couple with a framed picture to use at the reception as a guest book - something the bride never got around to doing on her own and wanted so badly for her reception. Speeches were given by all...and let me tell you...it was a joyous occasion without a dry eye in the house. This couple is so in love and so perfect for each other.