Hosting a New Year's Soiree? Here's a simple idea for party favors and fun. All you need are a few things from your party store and to make a trip to the grocery to create a little baggy of fun.
What we have above is tissue paper, favor bags, noise makers and your favorite snacks. I went with a sweet and salty combo. All you do is fold up the tissue paper, put in your snacks and roll up the top with the noise makers. Simple and quick. I did one for each couple.
Add some silly 2010 glasses, snack plates and of course champange and you're ready to go!
Happy New Year everyone! I'm looking forward to 2010!
December 30, 2009
New Year's Champagne Count Down.
Labels:
Holiday,
Inspiration,
Silver and Gold,
Table Decor
December 24, 2009
Jingle All The Way.
Love these jingle bells from Old Time Pottery to add a little cheer and glitz to a special gift under the tree.
Labels:
Holiday,
Inspiration
December 23, 2009
Make It Something Special.
We've all done it. We peel the sticky stuff off the back and slap it on a present at the last minute. Guilty. Before you get completely complacent with that option, consider another.
Transform that plain ole bow into something more special. Here's a step-by-step:
- Take your regular gift bow and get ready to snip snip!
- Start by taking your scissors and cutting out all the loops. I suggest that you cut just inside of the curve of the loop so it keeps is shape and curls inward.
- Make sure to cut all of the loops and push all of the curls out of the way.
- Once you have all of the loops cut, do the same to your second bow.
- Place your second bow inside the fist and fluff!
MERRY CHRISTMAS!
December 18, 2009
Making Last Minute Gifts Look Not So Last Minute.
We've all be there. The last of the gifts have been bought but you still need to wrap them! (They usually end up in a gift bag with bright red and green tissue paper stuffed on top.) It's not hard to make your gifts look like you spent a lot of time on them - inside and out. And who better to show us all the possibilities for any occasion than Martha Stewart her self. Here's a little photo montage for inspiration.
I truly like this the image above - doilies are so inexpensive but look at the whimsy it brings to this package. And you don't even have to tie a bow! Pretty much anything you grab to put on a package as a bow or garnish to make a gift look that much more special. Yarn, pipe cleaners, left over ribbon, fabric from the $1 bin. I am a big believer in real ribbon for gifts. I looks much more personal. And if that is all you add to your wrapping, then it's a big step!
With a little planning and some creativity, we can all wrap like Martha. Enjoy your last minute shopping!
December 16, 2009
Q. & A. ::: Are Wreaths Year-Round Decor?
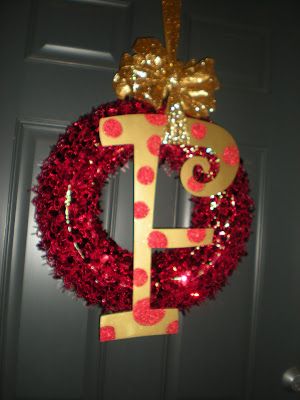
Q: Got a decor question for you. Are wreaths year round?? I would love to make a wreath like you did with the "F" on it, but I have blown my Christmas decor budget and need to wait until after Christmas to make one. But, I don't if they are year round and what colors to use?! Help please.
A: Yes, I think so. I keep my red one up until Valentine's Day. Then switch to yellow for Spring and Summer, (briefly taking it down so the finches don't make a nest in it), orange for fall and back to red for the holiday's. I would suggest a grapevine wreath - very inexpensive and lasts forever + goes with every season. Each season, you can repaint your C and add picks of berries or flowers to go with the season. That way, you have one wreath to buy with many options! Michael's has a lot of Christmas stuff 60% off right now and often sends out a 40% off coupon. Go through your Christmas decorations that you aren't using or pull some stuff off of your tree and wallah! I got my "F", which is metal, from Kathy's of McMinnville at Christmas Village and painted it myself.
Labels:
Q and A
December 10, 2009
Mantel Mount Up.
Good-bye traditional mantel....Heeeeello Christmas!
Green trees: TJMaxx
Wreath: Pier 1
Stocking Hangers: Wal-Mart
Green Ornaments: My tree
Red and Gold sprays: Old Time Pottery
Stockings: hand designed and made
Gold Candle Sticks: Old Time Pottery
Green trees: TJMaxx
Wreath: Pier 1
Stocking Hangers: Wal-Mart
Green Ornaments: My tree
Red and Gold sprays: Old Time Pottery
Stockings: hand designed and made
Gold Candle Sticks: Old Time Pottery
Labels:
Green,
Holiday,
Red,
Silver and Gold
December 7, 2009
Recycle Your Fall Wreath for the Holiday's.
Remember this fall wreath from last month?
Well, it's not the same any more! I updated it for Christmas and here's the final product:
I used the same spray paint from the top hat Christmas tree topper - gold metallic then glitter gold. Then I painted the dots a metallic green. And that didn't work! Not enough contrast between the gold and green. So, I decided to sprinkle red glitter on the still-wet green paint and wallah!
I really think it adds so much more personality to the wreath!
The rest of the decor goes like this:
Wreath: Old Time Pottery
Large Ornaments: Old Time Pottery
Pre-Lit Garland: Wal-Mart
Gold Ribbon: TJMaxx
Light timmer: Wal-Mart
Labels:
Holiday,
Inspiration,
Silver and Gold
December 4, 2009
Holiday Entertaining. Table Design Tips.
Your dining room table is a great place to get glammed up for the holiday's. It's probably the largest place you can take advantage of for any seasonal decor. And if you don't have a mantel, then this is the place to set your focal point. A few basic tips:
1. Chose a theme. This one is simple. It's silver.
2. Chose a centerpiece. Usually the tallest piece of the collection.
3. Place items of varying height around it for balance.
4. Use odd numbers in your groupings but...
5. Symmetry is always your friend.
(Notice in #4, although I used even numbers of everything, there are 5 groups of items.)
Take your time looking in magazines or online to find what you feel fits your style personality.
This table isn't fully set for a dinner party, but it you need entertaining guidelines, Emily Post (heart her!) has a range of table setting guides from casual to formal here.
Tall Centerpiece: Vase: Old Time Pottery, Silver Branches: Old Time Pottery, Silver Spray: Old Time Pottery
Mirrors: Old Time pottery
Candle Sticks and Candles: Old Time Pottery
Silver pillar candles: Michael's
Square and Cylinder Vases: Target
White Vase Filler: Wal-Mart (a bargain!)
Silver Christmas Trees: Target
Silver mozaic candle holders: Old Time Pottery
Silver chargers: Hobby Lobby
Christmas China: Lenox
Silver balls: TJMaxx
Labels:
Holiday,
Inspiration,
Silver and Gold,
Table Decor
December 2, 2009
Topping Off Your Christmas Tree. 2.
A top hat for your tree. How fun!
Here's how it was made! On a trip to Party City, I walked past this little gem. A Top Hat Ice Bucket. $10.And I thought - what a cute way to top off your tree!
After a trip to Michael's Crafts, conveniently down the street, I came home with a plan and lots of spray paint.
1. Fusion for Plastic
2. 18kt. Gold
3. Glitter in gold
For a base layer, I used a spray paint specifically for plastic. No sanding, no priming, quick drying, chip resistant. Then I used a metallic gold to act as the background color for the 3rd layer of gold glitter spray paint to glam it up some.
With a little green glittery ribbon and a few glittery feathers to top it off (no pun intended), I was extremely happy with the way it turned out!
Labels:
Holiday,
Inspiration
Subscribe to:
Posts (Atom)